4 Measuring mid-upper arm circumference (MUAC)
4.1 Equipment

MUAC is a quick and simple way to determine whether or not a child is malnourished using a simple coloured plastic strip. There are different types of MUAC tape available. All are graduated in millimetres and some are colour coded (red, yellow and green) to indicate the nutritional status of a child or adult. The colour codes and gradations vary depending on the tape type.
The most appropriate MUAC tape to use would be the tapes that use the latest WHO Growth Standards cut-offs for acute malnutrition. These are the tapes that have three colours (red, yellow, green) with colour cut-offs at 115 mm and 125 mm. The MUAC tapes should also be precise up to 1 mm. The material for the MUAC tape needs to be flexible but non-stretchable. An example of this kind of MUAC tape is shown in Figure 4.1.
4.2 Personnel
Only a single measurer is required to measure the MUAC of a child. If with an assistant is available, he/she records the MUAC measurement.
4.3 Steps in measuring MUAC
When measuring MUAC, ensure work at eye level. Sit down when possible. Very young children can be held by their mother during this procedure. Ask the mother to remove clothing that may cover the child’s left arm.
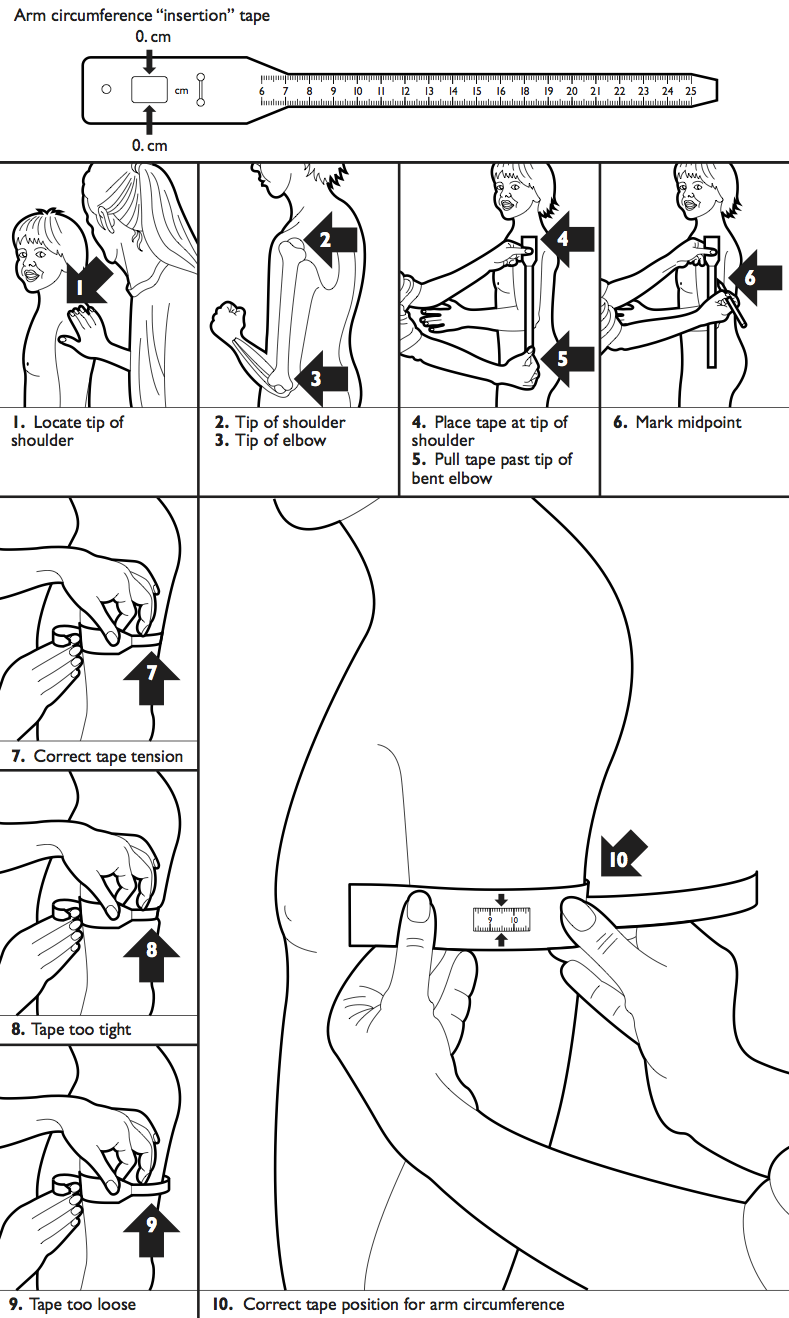
Measurer calculates the midpoint of the child’s left upper arm by first locating the tip of the child’s shoulder (arrows 1 and 2) with finger tips. Bend the child’s elbow to make a right angle (arrow 3). Place the tape at zero, which is indicated by two arrows, on the tip of the shoulder (arrow 4) and pull the tape straight down past the tip of the elbow (arrow 5). Read the number at the tip of the elbow to the nearest centimetre. Divide this number by two to estimate the midpoint. As an alternative, bend the tape up to the middle length to estimate the midpoint. A piece of string can also be used for this purpose. Either you or an assistant can mark the midpoint with a pen on the arm (arrow 6).
Measurer straightens the child’s arm and wraps the tape around the arm at midpoint. Make sure the numbers are right side up. Make sure the tape is flat around the skin (arrow 7).
Measurer and assistant inspects the tension of the tape on the child’s arm. Make sure the tape has the proper tension (arrow 7) and is not too tight or too loose (arrows 8-9). Repeat any steps as necessary.
Assistant is on ready with the paper questionnaire or the mobile device.
When the tape is in the correct position on the arm with the correct tension, measurer reads and calls out the measurement to the nearest 0.1 cm. (arrow 10).
Assistant immediately records the measurement on the questionnaire or the mobile device and shows it to the measurer.
While the assistant records the measurement, measurer loosens the tape on the child’s arm.
Measurer checks the recorded measurement on the questionnaire or mobile device for accuracy and legibility then instructs the assistant to erase and correct any errors.
Measurer removes the tape from the child’s arm.
- measuring on the right arm;
- estimating (rather than measuring) the mid-point of the upper arm;
- bending the MUAC tape when measuring the midpoint;
- not measuring the midpoint from the tip of the shoulder to the elbow bend;
- pulling the MUAC tape too tight;
- not pulling the MUAC tape tight enough (too slack); and,
- not reading the tape accurately (to nearest millimetre).